


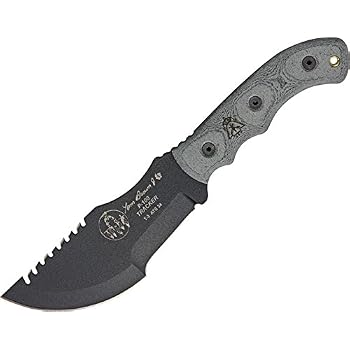
Produced by Lion Steel in Italy for Mr. Blade the S-Hardy is designed as a robust cutting and chopping tool, that will easily take on the toughest of jobs. The blade is of D2 tool steel and is described by the manufacturer as a modified tanto-recurve shape. It's not truly a re-curve blade though as the point in the blade where the grind angle changes forms a sort of 'tooth' and isn't a completely smooth curve. It's a little reminiscent of the blade shape of the Tom Brown Tracker knife although the 'tooth' isn't as pronounced or aggressive.
It's similarity with the Tracker is one of the reasons for this review, I am very critical of the design of the Tracker and really can't understand the rationale for the design or why an outdoorsman as celebrated as Tom Brown Jr. would advocate it's use when all my considerable outdoors experience indicates that it would be a poor choice for a backwoods tool. In my posts about the design process of my own bushcraft knife I wrote a little about the Tracker and other iconic bushcraft knives;
 |
"As well as his [Tom Brown Jr's] incredible, unbelievable, claims about his experiences I just can't take anyone seriously who puts their name on a knife like this and claims that it is anything other than a heavy duty chopping tool. It's massively heavy and features a weird dog tooth which seems to have been adopted in a few other knife patterns since it first appeared on the tracker. This feature interrupts the edge of the knife meaning the section closest to the handle can really only be used for push cuts, a knife with a continuous curve or even a strait section which seamlessly curves up at the point doesn't snag on the material you are cutting and is easy to sharpen, unlike the tracker. The saw on the back is a gimmick and doesn't cut properly although this is explained away by the designers, manufacturers and fans saying that it was only ever designed to produce clean square edged notches for trap making. My questions to them are first; show me what use those perfectly square notches are? Second; if you are skilled with a knife aren't those notches just as easy to make with the blade of a knife? Third; why add a feature that detracts from the overall utility of the knife by making it uncomfortable to apply pressure to the back of the blade?
So you can see that I'm not a fan of the Tracker, nor of the feature that the S-Hardy shares with it, but I wanted to see how this particular knife performs and to try a new knife company that I hadn't heard of before.
 |
| First of all it came in a box with a very cool logo |
It comes with a very well made leather sheath which honestly is a little fancy for my taste, I like plain sheaths and the white stitching and two tone leather is a little decadent for me, also the retention strap for the handle is eventually going to be cut through where the swell at the front of the blade catches it every time the knife is drawn and sheathed. With the slightly unusual blade shape it's not a knife that will fit in an aftermarket pouch sheath which is often what happens to my knives like the Extrema Ratio Scout 1 which I re-sheathed in a Sharpshooter pouch sheath rather than the nylon MOLLE sheath it arrived with.
 |
| You can see that the 'dog tooth' section of the blade runs across the retention strap every time the knife is drawn it wont take long for it to be cut through entirely. |
 |
| It is an attractive package though and I can't complain about it's performance, it feather sticks well and it's 5.27 inch blade is great for battoning and light chopping. |
While the S-Hardy is good for the heavier tasks required of a bushcraft or survival knife it does become uncomfortable after extended use, not so uncomfortable that it's a major problem but the handle cut out toward the back of the handle irritates and fatigues my pinky finger and the palm of my hand. I get the same issue during extended fine carving tasks and it falls down in that area as the false top edge makes it difficult and uncomfortable to apply pressure to the top of the blade during fine carving. Also the longer blade makes it difficult to span the knife with your hand and use you thumb on top of the blade to support cuts.
While the 'modified tanto' shape does bring the knife to a sharp point, something I look for in every knife I use, the blade quickly broadens out and it quickly goes from a fine point to over an inch thick so it really can't do the fine carving that I consider an acid test of bushcraft knives.
One of these 'acid test' tasks I do with all the knives you'll see tested here is to carve a netting needle and unfortunately the S-Hardy did not perform well in this regard, mainly because of that fairly broad blade which levers apart the wood fibres as you try to make small cuts on the inside edges of the needle;


I can't fault the quality or the choice of materials for this knife, although I'm less impressed with the sheath for reasons I've already stated. I like D2 steel in general and can't fault it even though I'm fully aware that there are more impressive steels out there. The handle can be uncomfortable as I've mentioned and it will cause you some discomfort if you use it for extended periods and it really isn't a fine carving tool where it excels is light chopping, battoning and much to my surprise feather sticking. I was concerned that the dog tooth edge would get in the way when feather sticking but there is just enough blade length between the choil and tooth to get decent feathers but you won't get the use of the full length of the blade when feathering or carving due to that tooth which in a more general purpose knife is a bit of a waste of a blade.
_________________________________________________________________________________
Because we've dwelt on the S-Hardys ability to make feather sticks todays lesson linked with this review will be on feather sticks;
Feather sticks are simply aids to lighting a fire, without small tinder such as dry grass, matchstick thin dry twigs, dry nettle and hogweed stems etc... you need to make fine tinder. This is particularly important in winter when dry material is often sodden or buried in snow. Select some dead dry wood, this will often be found on dead limbs or hung up in trees, if you have a saw cut it to ten to twelve inch lengths, if not you can use a batton to nibble through it with your knife or as it's dry break it against a tree or rock.

Now split it with your axe or hatchet or batton through it lengthwise with your knife, for perfect feather sticks aim to split your wood down into pieces roughly an inch square. Now you can feather each of these pieces and you will need a pile of them to get a decent fire going, half a dozen or so would be ideal. You should be aiming to get the remaining wood so thin that the fat end of the feather stick will light from the feathers, you don't want to just burn off the feathers you want the whole lot to catch light and form the basis of your fire.
 |
| One of those 'model' feather sticks that you can find online or in some poorly written and researched survival guides, these curls would all burn off before the rest of the wood catches and looking at how curly they aren't this is probably made of wet wood. Wet wood doesn't curl nicely like dry wood does. |
Image b R HORNE - http://en.wikipedia.org/wiki/File:Char1.jpg, Public Domain, Link
 |
| Lighting a fire with feather sticks, most of the curls have already burned away but the fire is still burning because the sticks were whittled thin enough |
 |
| Feather sticks on the banks of a frozen lake in Sweden |
For the full fire lighting process including feather stick making have a look at this video of mine from a few years ago;
So that's it for this months review, the Mr. Blade S-Hardy and feather sticks, I hope you enjoyed it and you can look forward to a more detailed lesson about feather sticks as we build on the Bushcraft Basics pages.
No comments:
Post a Comment
Note: only a member of this blog may post a comment.