A post shared by Geoffrey Guy (@gguy_bushcrafteducation) on
If you have been keeping up with my wild food micro blog; Foragers Diary you will see that eggs have featured in a few of the recent updates. It is worth discussing the legal issues regarding the foraging of eggs for food, in a survival situation I would consider it acceptable to take and eat eggs from birds nests, however I am currently not in a survival situation and since the 1954 protection of Birds Act it is illegal to interfere with or take the eggs of wild birds, so where am I getting my eggs from?
The eggs that have featured in recent posts come from captive pheasants and partridges and most of them are destined for an incubator to be hatched and reared ready for release on to a shooting estate. A few surplus eggs though make it into my kitchen and are a lovely semi-wild addition to our diet. We collect them just as you would eggs from domestic chickens from pheasants that are captured and housed in large outdoor laying pens, these birds which provide the eggs are also released once the laying season is over, they will generally lay from the beginning of April until mid May. Each year at the end of January we set large cage traps to capture enough cocks and hens to lay eggs for us again. As pheasants and partridges are game birds this is acceptable, to catch other species of birds from the wild or to interfere with their nests and eggs though is normally illegal.
Game keepers did historically take eggs from the nests of partridges to rear themselves to improve the success of hatches and better protect them from predators but this isn't done any more although you can collect eggs from wild duck nests and rear and release the chicks under the conditions of a general licence.
For this licence to apply you need to be operating under the authority of the landowner or local authority though, it doesn't grant just anyone permission to destroy the eggs and nests of these species though and it does need to be for purposes of conservation not just because you fancy a goose egg for breakfast.
So before you head out foraging in the spring time and expect to make a delicious omelette remember that you generally can't interfere with the eggs and nests of wild birds.
Wild greens turned a boring ham roll on a picnic into a delicious ham salad.
I'm dedicating this month's post to wild greens, it's true that there are some greens available all year, even in Winter, most of the cress's produce have leaves all year round that can be eaten and I suppose you can make pine needle tea all year round but I am keen to provide proper meals by foraging not just a tiny taste of something.
The end of March and April signals the real start of Spring, the daffodils will have already flowered, blue bells will be starting and the wild food will be coming with it. DON'T EAT DAFFODILS OR BLUE BELLS THEY ARE POISONOUS!!
Sorrel is a great salad green and it's sweet lemony taste makes it suitable for deserts too.
Sorrel is a great accompaniment for fish too, here I've stuffed the gut cavity of a lovely rainbow trout with fresh sorrel leaves and it made a delicious meal.
Opposite leaved golden saxifrage.
The golden saxifrage has bristly leaves at it's base.
And wood sorrel
Primrose flowers can be added to salads but also turned into tea, or even frozen into ice cubes or crystallised in honey and used to decorate cakes.
Colts foot is another excellent wild edible and yields edible leaves, stems and flowers. I often use the leaves in green quiches and as a spinach substitute but strangely colts foot produces it's flowers before it's leaves hence it's colloquial name 'sons before fathers' . The stems and flowers make a lovely sweet treat at this time of year though, the bulk of the leaves will come later.
These Japanese knot weed stems will make a great meal, substantial enough to be a main ingredient and can be used like asparagus or pickled or fermented like sour kraut.
Jack by the hedge or garlic mustard is a fine ingredient for SPARING use in salads as it's taste is quite strong, it also makes a great ingredient in soups or home made green pesto.
This is ladys smock or cuckoo flower and its flowers and leaves are a delicious peppery addition to salads.
Some fresh hog weed shoots are a great addition to soups or green quiches but I find them too hairy for salads.
.
A bag of nettles, cleavers, hog weed, jack by the hedge and cuckoo flower ready for a soup.
Softening in the pan
And the finished article garnished with ladys smock.
I've tried to include quite a few wild greens here but even that just scratches the surface of foraging opportunities in April. One other very seasonal wild food is the St. Georges mushroom which takes it's name from St. Georges Day on the 23rd April because that's when this fungi traditionally appears. It's also one of the first of the larger fungi to appear in the year and is a great treat after little more than jelly ear and scarlet elf cups for the last couple of months.
Hunting St. Georges Mushrooms
The firm white caps and gills, faint smell of flour and the fact that they are the only large white fungi out at this time of year are good clues to their identity.
St. Geogres mushrooms don't sweat much when cooked so they retain quite a firm texture and are absolutely delicious.
So enjoy April, it is a great time for wild food.
You will find a few recommendations below for those of you who want to learn more about foraging and wild food, I always say when it comes to bushcraft you are better off saving money on fancy kit and buying books instead and I stick by that, check out a few of these to learn more about wild food and foraging.
Yesterday we looked at a range of iconic knives and their designers specifications for those knives; both the successful ones and a few which do not really float my boat. I made it clear that all you really NEED for bushcraft is a Mora or similar knife, I would feel dishonest saying that you need a more costly knife to do bushcraft but because I use a knife so often I have developed certain preferences and a budget Mora or Hultafors doesn't quite meet those criteria.
A Hultafors Craftsman knife and a Mora Companion; if I had nothing but one of these I would not be at a disadvantage and these are the kinds of knives I provide for my students when I teach bushcraft.
It's the small differences in knife design that make the difference in terms of it's suitability for an individual in my opinion; the grind, steel, blade shape, handle material, inclusion of a sharpening choil, ricasso or other features all of which might make a significant difference to the user but which, to the uninitiated, may not look or feel like a big deal.
We looked at some of the iconic bushcraft knives in yesterdays post and you will see that they are all fairly similar with a few minor differences, the nessmuk knife is the most 'different' one in line with his usage of the knife as a butchery and skinning tool rather than for wood working. We also saw some of the knives which broke the mold and discussed why they aren't really comparable to the knives of Ray Mears, Horace Kephart, Nessmuk and Mors Kochanski. Well just like all these people WANTED specific features in their knives I WANT a few specific things from mine.
So what did I WANT in my bushcraft knife?
I have a few personal preferences and a taste for wooden handles which aren't met by the Mora and Hutlafors ranges, my first forays into finding a knife which met all my requirements involved having a go at making my own;
Clockwisee from the top; spoon knife with yew handle, walnut handle on a blade made with a heavy duty hacksaw blade, a whittling knife made with a broken silky saw blade, an Enzo trapper blade with a New Zealand silver beech and sheep horn handle (I made this one for my wife)
I went through a phase of making knives myself but my skill never matched my enthusiasm and I was never really happy with the finish on my handles (except the Enzo above; I had been saving a piece of silver beech I had brought back from NZ for years for something and was never quite sure what until my wife wanted a bushcraft knife and that special piece of wood had to be hers, it's not great by professional standards but we were happy with it, and she uses it regularly). The quality of the blades I made myself was severely lacking and I didn't have the natural talent or time to get better at it so to get the knife I really WANTED I couldn't rely on my own skills to provide it.
Going to the length of designing and having a knife made to my own design wasn't something I took lightly, I didn't 'borrow' my Dad's copy of Lofty Wisemans SAS survival guide at age nine and immediately order a custom made knife. I didn't save up the proceeds of my paper round or first full time job to get a custom made knife. I didn't get a custom knife once I started teaching bushcraft regularly in fact I had been working in the woods and countryside for fifteen years and had been teaching bushcraft for over ten years before I went to the lengths of designing and ordering a custom made knife. This was the right way to go about the process too, by that stage I was very comfortable with my knife skills and was sure about my preferences, the grind I favoured, the blade shape I preferred, the tang and handle I wanted. If you rush into a custom knife you may find that as you use it you realise that the features you have are not what you eventually are comfortable with. I was well passed that phase when I designed a knife I knew what I wanted and have not been disappointed.
My initial sketch of the knife I wanted.
Now I have already made it clear that my knife making skill does not match my enthusiasm and it will be clear to most of you looking at my sketch that there are some design flaws in my sketch, particularly in the exposed portion of the tang. That's another reason I got in touch with a professional, someone who could not only make what I wanted but someone who could bring their experience as a knife maker to the design process and question my wishes if they weren't really realistic, a quality obviously lacking in some of the manufacturers of some of the knives I featured in yesterdays post, you would have thought that SOMEBODY would have questioned the features of the Tom Brown Tracker Knife.
Luckily I managed to find a knife maker who asked a lot of questions to work out exactly what I wanted and who helped me refine the design of the knife I wanted to make sure it would perform well. I looked around online a lot to find someone to make my knife for me an eventually I got in touch with Tim at Ammonite knives. One of his designs I particularly liked which drew me to contacting him were his field and fish knives;
Once I had got in touch I was able to set out my ideas of what I wanted in a knife;
A continuously curving cutting edge; a feature which is particularly useful for carving and whittling. This makes slicing cuts for the production of feather sticks easier and provides more edge area for the same blade length.
A sharp point; this almost goes without saying but you'd be surprised how many knives are out there without sharp points. I don't mean by that that they are blunt necessarily just that you couldn't really describe them as pointy;
Something like this medford folder, while it's point probably is sharp a blade that narrows at the tip and tapers to a point is much more useful and indeed essential for fine carving.
Full length, narrow tang; I wanted the full length for strength but a narrow tang so that my hand wouldn't have to come into contact with the tang in cold weather. For added security I wanted the tang to be secured with pins or similar through the handle.
Exposed pommel; not because I want to use it to crush the skulls of my enemies or use it for striking a fire steel but because I don't need the extra space on the handle. I'm not going to be holding onto the handle at the back to get a better swing for chopping so why have that extra piece of handle.
Lanyard hole; I don't normally use lanyards on my knives, certainly not wrist lanyards even if I am chopping vigorously with something designed for chopping like a bill hook or machete the thought of letting go and having it swing back towards me on it's lanyard is frankly terrifying, I certainly don't need that in my knife. What I do want though is a small lanyard to help pull it out of a deep carry sheath.
A convex grind; I had considered a scandi grind too but decided in the end that I wanted the added strength that a convex grind would provide especially in the fairly fine point that the knife would come to.
Impervious handle; although I like the way wooden handles look I originally wanted a kirinite or micarta handle so it wouldn't soak up any blood or other things which could contaminate my knife as I would be using this knife to process game.
Four - five inch blade; I'm not a fan of large blades except for specific jobs and find that four to five inches is about right for an all round knife, not too big for whittling and not so small that it can't be pressed to tasks which require a little more length.
Sharpening choil; large finger choils are a pet hate of mine but I do like a sharpening choil to allow me to sharpen the blade right up to the point it comes closest to the handle.
These are the sketches that Tim provided after I sent him my specifications and I went with the top one. My original sketch did have a slightly drop point blade but we eventually decided on the strait spine like many Scandinavian style knives. You will also notice in these sketches that once the tang narrows it doesn't widen again at the end like it did in my original sketch. Obviously my original sketch wouldn't work as the wider exposed pommel would never fit through the hole in the handle but sometimes it takes a more experienced pair of eyes to spot these things.
Tim and I also had a discussion about the handle material, I was after something that wouldn't soak up any blood or liquid and so had originally requested a kirinite handle. Tim explained that stabilised wood was just as impervious to liquid as synthetic materials are though as they are completely impregnated with resin. With this in mind we decided on a piece of stabilised elm burl for the handle which satisfied my aesthetic preference for a well figured wood handle and for a handle that would be impervious to liquids. As the build started we also went for a buffalo horn bolster.
A final finishing touch was added to the knife with a small metallic ammonite fossil set in resin on the right hand side. Quite fittingly the ammonite came from my home county of Kent.
A knife isn't complete without a sheath and quite a few production knives are let down by inferior sheaths, the TOPS C.U.B is one which will be reviewed here in June which was an excellent knife in an appalling sheath. A sheath is another reason that some might upgrade from a Mora, the plastic sheaths are very hygienic but eventually loose their retention and the knives in them begin to rattle. Add to that the aesthetic appeal of a leather sheath and the preference of a lot of bushcrafters for traditional materials and leather is often a good pick for a sheath.
I do like the look of leather sheaths and as this was a knife I WANTED rather than one which I would need in the larder for large scale food prep and game processing for sale into the food chain, I would of course use it for processing some game but I went for a leather sheath. It was to be a deep carry sheath leaving nothing but the very top of the knife handle visible. I wanted one that I could hang on my trouser belt without it dangling as I don't like the thump-thump of a dangler style knife sheath on my thigh as I move but I also wanted to be able to convert the sheath to dangle so I could wear it on a belt outside of my winter clothing in cold weather.
While the knife was being made Tim regularly sent tantalising pictures of the progress he was making on the knife.
My blade blank, ground to shape and ready to have the edge bevels ground.
Finished blade ready for a handle
Almost finished
The finished sheath with
detachable
dangler arrangement.
It wasn't long before Tim emailed me to let me know that the finished knife was ready to send and I excitedly waited for it to arrive. Once it did I wasn't disappointed and have enjoyed using it ever since. I've had it a few months now and it's been working hard. It has dressed a couple of deer, several dozen ducks pheasants and geese and has been an excellent camp companion and general carving/whittling knife, in short i does everything a bushcraft knife should do.
The finished knife with a small lanyard I made to help withdraw it from it's sheath.
A close up of the sharpening choil, bolster and Tim's ammonite logo
The handle including the ammonite set in resin.
Carving a spoon
At work preparing duck, goose and pheasant for a game curry.
Using my knife as an improvised draw knife
This is the knife I WANT for my bushcrafting, it has all the features I want in one package and is attractive as well as functional. That doesn't mean that it will be right for everyone but it is perfect for my needs and I would highly recommend it and Tim's craftsmanship, you can check out his knives on his website at www.ammoniteknives.co.uk and follow him on instagram to see more of his knives;
When people ask me to recommend a bushcraft knife I tend to recommend budget friendly knives and ones which are easy to maintain and keep clean, that tends to mean, kydex or plastic sheaths, handles of plastic or rubber and stainless steel. I have written about choosing a knife a few times and you can refer to the Bushcraft Basics pages for advice on choosing a knife or to some of my other articles in the Countrymans weekly and on survival knives for the Camp4 website HERE.
Hultafors craftsman and Mora companion, very cost effective and perfectly adequate bushcraft knives.
While a simple Mora companion or similar knife, when combined with other bushcraft tools such as an axe and saw, is all you NEED for every possible bushcraft task and will cost no more that £15 at the very most.
If you never upgraded from a Mora you would not be at a disadvantage, unless you wanted to stab your way through a car bonnet or pound your knife into a tree and use it as a step, which seems to be the craze on youtube, A Mora's stick tang won't be up to this abuse. The Mora will do every SENSIBLE thing you need it to as long as it is used along side an axe and saw and isn't pressed to tasks which are too much for it.
A Mora companion blade with it's stick tang
That stick tang might be the first reason that someone would look for an upgrade though, a more robust full tang so the knife can be used for heavier batoning, and thicker steel for strength. Maybe you want wooden handles and a leather sheath just because they look nice even if from a butchery and game preparation perspective these materials aren't desirable as they might soak up blood and dirt and contaminate a carcass you are working on and preparing to eat.
As you gain in experience and use your knife regularly you will decide for yourself what you want in a knife. You may have specific requirements based on the kind of work you most regularly undertake with your knife or maybe you want a knife that is specifically made to fit your hand.
You may have a particular preference for a certain grind; maybe you do a lot of game prep and want a full flat or hollow grind on your knife which is best for processing meat. Maybe you primarily use your knife for intricate carving and want a short, sharply pointed blade with a Scandinavian grind for wood working. Maybe you want something which combines these features in a 'one tool' package which can adequately perform all your camp tasks without being too specialised.
Outdoors-men have been having knives made to their particular specifications for generations, to suit their specific preferences or because they felt that the knives commonly available at the time were unsuitable. Some examples of particular knives that have become standard patterns amongst knife makers and for use in the outdoors include;
Horace Kephart is one of the fathers of national parks in the United States and Mount Kephart in the Smokey Mountain National Park is named after him. He was trained and employed originally as a librarian but wrote often about hunting and camping. Many of his writings were compiled into a single volume and published in 1906 as Camping and Woodcraft. He regularly commented about knives and the specification of his ideal knife in his writings, including this from Woodcraft and Camping;
“On the subject of hunting knives I am tempted to be diffuse. In my green and callow days (perhaps not yet over) I tried nearly everything in the knife line from a shoemaker’s skiver to a machete, and I had knives made to order. The conventional hunting knife is, or was until quite recently, of the familiar dime-novel pattern invented by Colonel Bowie. Such a knife is too thick and clumsy to whittle with, much too thick for a good skinning knife, and too sharply pointed to cook and eat with. It is always tempered too hard. When put to the rough service for which it is supposed to be intended, as in cutting through the ossified false ribs of an old buck, it is an even bet that out will come a nick as big as a saw-tooth — and Sheridan forty miles from a grindstone! Such a knife is shaped expressly for stabbing, which is about the very last thing that a woodsman ever has occasion to do, our lamented grandmothers to the contrary notwithstanding.”
“A camper has use for a common-sense sheath-knife, sometimes for dressing big game, but oftener for such homely work as cutting sticks, slicing bacon, and frying “spuds.” For such purposes a rather thin, broadpointed blade is required, and it need not be over four or five inches long. Nothing is gained by a longer blade, and it would be in one’s way every time he sat down.”
“Such a knife, bearing the marks of hard usage, lies before me. Its blade and handle are each 4 1/2 inches long, the blade being 1 inch wide, 1/8th inch thick on the back, broad pointed, and continued through the handle as a hasp and riveted to it. It is tempered hard enough to cut green hardwood sticks, but soft enough so that when it strikes a knot or bone it will, if anything, turn rather than nick; then a whetstone soon puts it in order. The Abyssinians have a saying, “If a sword bends, we can straighten it; but if it breaks, who can mend it? ” So with a knife or hatchet.”
“The handle of this knife is of oval cross-section, long enough to give a good grip for the whole hand, and with no sharp edges to blister one’s hand. It has a 1/4 inch knob behind the cutting edge as a guard, but there is no guard on the back, for it would be useless and in the way. The handle is of light but hard wood, 3/4 inch thick at the butt and tapering to 1/2 inch forward, so as to enter the sheath easily and grip it tightly.”
If this description is not enough he also designed this knife for production by the Colclesser Bothers and the knife was produced and sold. Only two are known to still be in existence, one in a museum and one in a private collection but we have pictures of them to refer to, you can see a picture of the original knife further up the page and many modern knives copy his pattern almost exactly;
George Washington Sears, known by his pen-name of 'nessmuk' was an American writer and outdoorsman who published a book on 'woodcraft' in 1884 which has become a seminal text on camping, bushcraft and the outdoors. In it he describes his ideal cutting tools including the knife he recommends. Many have since copied it and applied it's shape to knives now sold as bushcraft knives, perhaps without truly understanding how Nessmuk himself used this knife.
Nessmuk was an advocate of travelling light and making use of basic tools and superior skill to make your trips rather than relying on porters and heavy gear, a point he returns to regularly in his writing. The tools he recommends to the light weight camper include a small double bit hatchet, a sheath knife and a pocket knife. if we carefully read what he had to say we will soon realise that 99% of the jobs we do with our bushcraft knives today Nessmuk performed with his pocket knife. His sheath knife was strictly reserved for skinning and preparing game and was kept razor sharp for that purpose and that purpose alone. As a skinning knife it has a shape we would recognise but is very different from your average modern day bushcraft knife.
The picture to the left from woodcraft shows nessmuks tools of choice and if you search for 'nessmuk knife' now you will find a range of beautiful modern interpretations of his knife but many of them will not faithfully represent his knife except in basic outline. The hunch backed blade is reminiscent of butchers carving knives or skinning knives but most of the modern copies have the thick spine and grind of a 'survival' knife meaning it is not the specialist tool Nessmuk had in mind but rather an all round bushcraft knife forced into the shape of his old skinning knife. The knife that would have been his utility knife for whittling, carving and other chores would have been his pocket knife. Pocket knives don't get good press among bushcrafters as a whole nowadays, the reason being the inherent insecure nature of the blade and handle. A blade that folds might fold when you don't want it to and is inherently weaker than a fixed blade knife and therefore doesn't inspire confidence when doing tasks which might require more strength or force. However a pocket knife tends to be what we have available to us most of the time and if you want to practice bushcraft more than just casually I suggest a strong pocket knife which can be used at all times so that you can take advantage of opportunities for a little foraging, whittling and collecting even when you can't justify carrying a sheath knife.
A modern take on nessmuks outdoor tools, the Camilus Bushcrafter, it may share it's outline with nessmuks original design but you can clearly see the Scandinavian grind and thick blade steel. The two or three bladed pocket knife would have been his main utility blade(s) here represented by a Case Stockman.
A few other examples of modern 'nessmuk' pattern knives include;
Boker Nessmi miniature nessmuk style knife
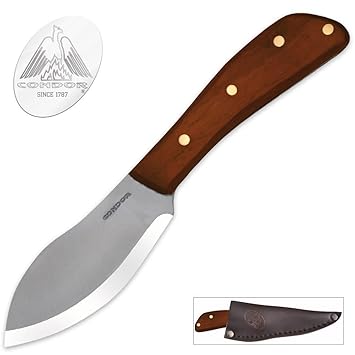
Condor 'Nessmuk' Knife
Woodlore
Ray Mears is probably the person who has had the biggest single influence on modern bushcraft and on the public perception of a 'bushcraft knife'.
Ray Mears knife was made famous in his TV programmes and was originally produced by custom knife maker Alan Wood.
Alan Wood said the following about the knife he produced for Ray Mears and which was later marketed as the Woodlore knife;
“Ray contacted me to discuss a British knife specifically designed for bushcraft…
He wanted a smallish knife, handmade and as British as possible that was to become the Woodlore Neck Knife due to the sheath concept that allowed carry with a cord around the neck or slung under the arm for discrete carry or Arctic use. He wanted carbon steel as he felt stainless had no “soul”, a full, non-tapered tang and the short Nordic grind, a wood handle from native trees and a design that was devoid of frippery.”
“He still wanted the short bevel grind and explained that most people who attended his courses weren’t necessarily “knife people” and that it would be easier for them to sharpen if they could lay the whole bevel on the hone. Also, he needed the wedge-like edge that it produced for specific bushcraft tasks and controlled woodworking cuts.
…
The first knives were made from 5/32” x 1¼” O1 steel at a hardness of Rockwell C-56/57… I fitted the maple and shaped the handles with my normal palm swell and flared and domed butt. The wood was dyed to bring out the grain and given an oil finish with Danish Oil. The sheaths were wet moulded from vegetable tanned hide and finished with an oil/wax molten mix.
The spine was ground flat and square to be used for “Fireflash” ferrociem rods and other scraping tasks.
Contrary to popular belief the Woodlore blade shape has never been a “spear-point”. The spine has always been an arc and the edge shape has a little straight section and a parabolic flow and not a symmetrical spear shape which offers less utility.”
(These comments were originally available on Alan Wood's website which is no longer online but can also be found on the Truth About Knives Website in their page on the woodlore knife)
As well as gaining a fantastic reputation as an all round bushcraft knife the woodlore knife came with an enormous price (£495) and it's no longer available to order as Alan Wood has stopped making them although I am under the impression that he is still working through the waiting list of old orders for the woodlore. Knives following the same design specifications are still made under the Ray Mears name but most are either out of stock (the Ray Mears knife produced by Emberleaf Workshops for example with an RRP of £450) or production has ceased entirely due to the sad death of knife maker Steven Wade Cox in December 2016 who made the Woodlore Knife Pro model. Knives designed by Ray are now collectors items as much as functional tools.
The Woodlore Pro by Steven Wade Cox features a straighter spine then the iconic downward curving spine of the original Woodlore knife.
As with other popular knife patterns the woodlore has been copied time and again with several custom makers offering 'woodlore clones' either in an attempt to cash in on the popularity of the woodlore style or perhaps to offer a more affordable option than the very expensive official versions;
Condor Woodlaw
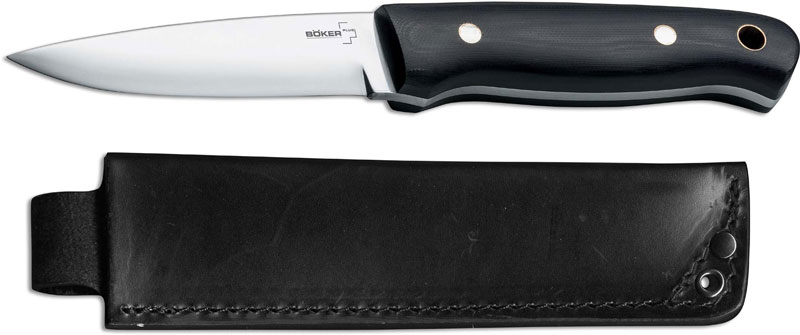
Böker Next Generation Bushcraft Knife
Skookum Bushtool
Although not specifically designed by Mors Kochanski it was inspired by his description of the ideal bushcraft knife in his book Northern Bushcraft. Mors Kochanski has made a video about the knives he has used throughout his life teaching bushcraft and survival skills and which explains his requirements for a bushcraft knife;
Knife maker Rod Garcia made the Skookum Bushtool after reading Mors' book and attending one of his courses to specifically match Mors description and provide a more robust option than the typical Mora knife.
All these knives are now iconic amongst knife enthusiasts and bushcrafters alike and are standards to judge other knives on but they were all born in the minds of experienced outdoorsmen and bushcrafters. For some books by the four bushcraft legends who's knives I've shown above check out these links below and I'll say it again IT'S BETTER TO SPEND YOUR MONEY ON BOOKS THAN KIT, by all means buy an expensive knife or design one and have it made to your specification but all you NEED is a Mora and you would be better off learning the skills in these books and using the change from the £400 you'd spend on some of these knives to travel into the woods and practice your skills.
As well as the very well thought out, tried, tested and proven knives shown above there are plenty on the market, some designed by very well known 'celebrity' bushcrafters and survivalists, which are quite frankly a disaster.
There are many that would argue that there is no need to re-invent the wheel when it comes to knives and that there are plenty of production models which will do everything you need them to. I am inclined to agree with them and in fact knives that try to re-invent the wheel or pack in too many features tend to end up not being good at anything;
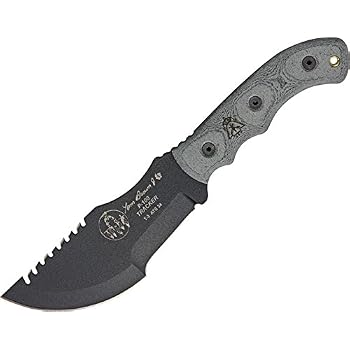
TOPS Tom Brown Tracker Knife
The Tom Brown Tracker knife by TOPS is an example of this. Tom Brown Jr. is a big name in Bushcraft and Survival training but he won't be appearing amongst my Bushcraft Heroes, I may be doing him a disservice and there are many people who swear by his techniques and teachings but I have spent enough time in the outdoors, working with wildlife that I just can't believe everything he writes in his books and which he claims to have done, read the Alien Killer chapter of his book Way of the Scout; you'll see what I mean.
As well as his incredible, unbelievable, claims I just can't take anyone seriously who puts their name on a knife like this and claims that it is anything other than a heavy duty chopping tool. It's massively heavy and features a weird dog tooth which seems to have been adopted in a few other knife patterns since it first appeared on the tracker. This feature interrupts the edge of the knife meaning the section closest to the handle can really only be used for push cuts, a knife with a continuous curve or even a strait section which seamlessly curves up at the point doesn't snag on the material you are cutting and is easy to sharpen, unlike the tracker. The saw on the back is a gimmick and doesn't cut properly although this is explained away by the designers, manufacturers and fans saying that it was only ever designed to produce clean square edged notches for trap making. My questions to them are first; show me what use those perfectly square notches are? Second; if you are skilled with a knife aren't those notches just as easy to make with the blade of a knife? Third; why add a feature that detracts from the overall utility of the knife by making it uncomfortable to apply pressure to the back of the blade?
Another example of a knife that tries to hard to be different and to fit everything feature of your standard bushcraft toolkit into a single blade is the 'MSK';
I don't normally like to comment on a product without having tested it myself but I just can't justify the expense of deliberately buying a knife that I know won't suit my particular preferences, especially when even in it's most basic form it retails at over $300.
First off it's ugly, the bow drill divot in the handle is the same as any other knife with a bow drill divot; a gimmick and is largely useless, not to mention dangerous, on any knife it features on. The huge deep blade might be useful in a general utility knife but won't be useful for finer carving even with the large finger choil. Finger choils are a pet hate of mine, the rationale for them is flawed in my opinion; they shift the weight of the blade further away from the grip to make it better for chopping and allow you to 'choke up' on the knife and bring your index finger closer to the edge for more control when doing detailed work, but it's this detailed work that is going to be most fatiguing on your hand. A finger choil is not a comfortable way to hold a knife so you immediately sacrifice comfort to give you more chopping power, chopping power that is insignificant when compared to even the smallest of axes.
I know this is described as a survival knife and the argument with these knives is always that it is a one tool option and what if it's all you have. Well my counter argument to that is in what circumstance do you imagine that your knife is going to be any more accessible to you than an axe, if I had to rush out of the house in an emergency right now it wouldn't take any longer to grab an axe than a knife and in the case of a bugout bag a smaller knife plus small axe are not so much heavier than a single large knife that I would ever choose the single knife option over the knife/axe combo.
One final knife for the 'rogues gallery' of 'gimmicky' knives designed by celebrity survivalists is the Whiskey Knives Hustler designed by Creek Stewart.
I don't even know what to say about this knife, and the idea that the massively extended tang is to stick it in the ground so you don't have to lay it on the ground when you are using it to process game is frankly absurd. That's what this knife is marketed for; game prep and I really can't understand the rationale for the design. It's certainly broken the mold but possibly not it a good way.
So with some of the landmark bushcraft knives discussed in depth and some which have tried and failed to be a little different shown too what do I WANT in a bushcraft knife, I've already said that all I NEED is something like the Mora companion. These weren't necessarily an option back in Kephart and Nessmuks day but even though Mors Kochanski and Ray Mears have their names on knives made to their own design they still advocate the use of Mora knives and in fact it is my understanding that those are the knives provided for participants of their courses.
But what do I WANT in a knife, well I'll tell you but as this post has already gone on so long you will have to read part 2 to find out, it will be available tomorrow!


.jpg#/media/File:Nessmuk_(George_Washington_Sears).jpg)


